
Need a loaf of bread to go with your dinner? Try out the simple no knead bread!! All you need is time and natural science to make a great rising dough. The aroma and the crunchy crust but soft and chewy body texture of the right-out-of-the-oven-bread constructs the happiness of a home.

My loaf didn’t have large crumbs this time maybe due to the cold weather these days. I may try longer rising time next time to see how it goes. But it still tastes really good!!! Most of the recipes said you need a cast iron pot with lid to make no knead breads. However, I just simply use my baking pan with a tin foil cover, plus a large baking sheet filled with water in the lower layer of my oven; it works just fine!! So don’t worry about having to buy a $500 cast iron pot just so you can make bread. 😛

Servings: 2 loaves Time: 40 mins (not include rising) Difficulty: easy
Ingredients:
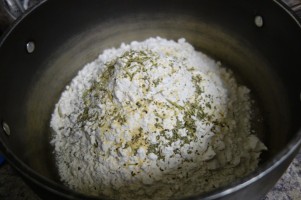
- All purpose flour or bread flour 5 cups
- Instant dry yeast 7 g/ 1 pack
- Sugar 1 tsp
- Salt 1 tsp
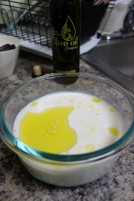
- Warm milk 440 ml
- Olive oil 1 tbsp
- Herbs mix (optional) (I use dried rosemary, basil, black pepper, onion powder, and garlic powder.)
-
I also put some chopped pecan into the dough, but it doesn't really add flavor or texture to the loaf. I would pass the nuts to my loaves next time. :)
Directions:
- Mix sugar and instant yeast into warm milk till it dissolves.

- Add 1 tbsp of olive oil into the yeast-milk mixture. Mix flour with salt and herbs, then pour in the yeast mixture to form the dough.
- Let the dough rise in room temperature for 8 hours or more, then transfer to the fridge for another 8 hours. (Be aware to have enough room for the dough to “grow,” about 2-3 times of the original size.)


- Prepare a working desk with plenty of flour dusting, a baking pan covered with one sheet of baking paper. Take out half of the dough and shape the dough to a long stick size. Transfer to the baking pan, cover with plastic wrap drizzled with vegetable oil, let the dough sit in room temperature for another 1 hour or more.


- Preheat oven to 450°F with a large baking sheet filled with water in the lower layer of oven. Use a sharp knife to cut a couple small lines to the surface of the dough. Cover with tin foil, bake for 20 mins, then remove the foil and bake for another 10 mins.

- Make sure the temperature inside reaches 200°F before moving to a cooling rack. Slice the bread after it is completely cooled.
免揉香草牛奶麵包
只要花時間耐心等待麵粉跟酵母發揮作用,就有香噴噴外脆內Q的麵包可以吃囉~ 大部分的食譜都說一定要貴鬆鬆的鑄鐵鍋加蓋來做免揉麵包。其實不需要,小Mon今天只用一般的烤盤加錫箔紙蓋,烤箱底層再加一個大烤盤的水增加水蒸氣濕度,一樣烤出美美的麵包喔!! 可能是這禮拜天氣比較冷,發酵沒有發的很完美,麵包雖然有氣孔但是不大,下次做的時候會再拉長冬天發酵的時間試試看效果如何。不過不減麵包的風味~剛出爐的麵包方便、健康又好吃!! 重點是做法超簡單啦~
材料:
- 中筋或高筋麵粉 5 杯 (如果有高筋麵粉會發比較好,但我今天用的是一般中筋)
- 酵母粉 7 克/ 1 包
- 砂糖 1 小匙
- 鹽 1 小匙
- 溫牛奶 440 ml
- 橄欖油 1 大匙
- 綜合香草 (依個人喜好適量) (我加了乾燥迷迭香、蘿勒、粗粒黑胡椒、洋蔥粉、大蒜粉)
-
我這次也有加一些碎胡桃進去麵糰裡,但是沒有增加烤出來的麵包香氣或是口感,吃起來感覺可有可無,所以可以省略,我下次也不會加了喔~ :)
做法:
- 溫牛奶加入糖和酵母粉拌勻融化
- 在牛奶酵母中加入橄欖油拌勻。均勻攪拌麵粉、鹽和綜合香草,倒入牛奶酵母液後,均勻攪拌成麵糰。
- 讓麵糰在室溫發酵8小時以上,放進冰箱再低溫發酵8小時。(麵團會長到2-3倍大,所以容器要有足夠的空間讓他長大喔!)
- 準備足夠的手粉在工作檯、一個適大的烤盤跟烤盤紙。拿出一半的麵糰,整型成長條形,放在烤盤上,用一張抹油的保鮮膜覆蓋進行二次發酵 1 小時 (室溫)
- 預熱烤箱450°F,放一個大烤盤裝滿水在烤箱底層。在發好的麵包麵糰上切幾道淺紋,用錫箔紙覆蓋,烤 20 分鐘後,打開錫箔紙再烤約 10 分鐘,或到表面金黃。
- 確認麵包內部溫度有達到約 200°F 就是烤熟囉!! 移到烤架上放涼,再切片就可以吃外殼脆、內Q香的歐式麵包了!!

